How to set up "Twilio Flex Integration", step by step
⚠️ Important: We recommend using Google Chrome for the installation process. If you use a different browser, make sure that third-party cookies are enabled. Do not use Incognito or private browsing mode, and check that your browser is not blocking third-party cookies. These settings are required for the app to install and function properly.
Begin by installing the app
1. Click the “Install app” button. This app is free to use!
2. Read and confirm the Privacy Policy. Click the “Accept and continue” button.
3. Select and connect your HubSpot account. Pay attention and connect the correct HubSpot account, this action cannot be changed later.
4. On the following page, you'll need to agree to connect this app to your HubSpot account. Click the 'Connect app' button.
You will be automatically redirected to your HubSpot account in Settings > Integrations > Connected Apps > General Settings for this App.
Enable the App and Choose a Plan
Before you can start using the app, you must enable it by choosing a plan. Click the 'Configure' button.
Account and preferences > Integrations > Connected apps > Twilio Flex Integration
In the window that will open, choose the plan most suited to your needs.
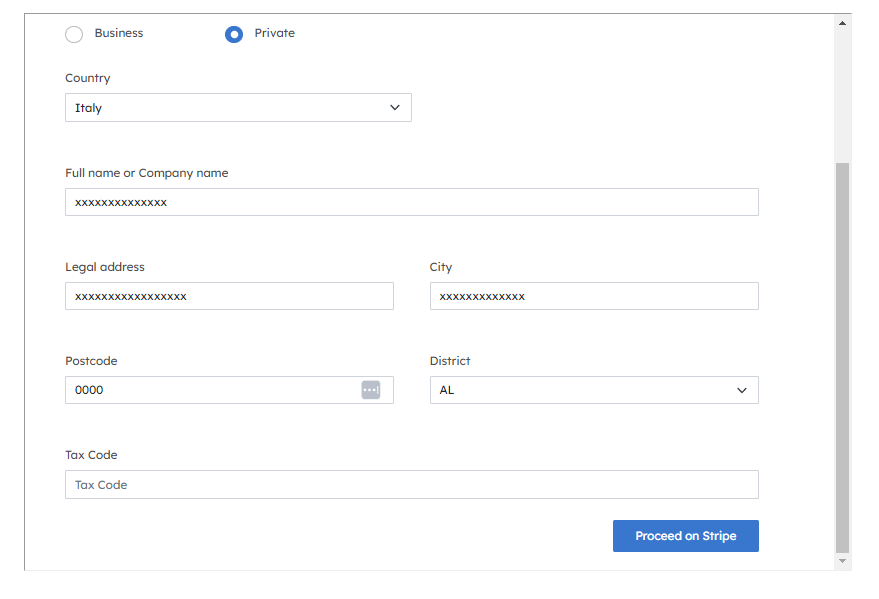
Insert Billing Information
Now you must enter your billing information; first, choose whether you are a private or business customer. Once the form is filled in, you can proceed with payment via Stripe.
Connect your Twilio Flex Account
Once you have made the payment, you will be asked to enter the information for the connection to your Twilio account.
You will need to enter your account SID and Auth Token. If you don't know where to find them please refer to this Twilio guide.
Once you have entered the required information HubSpot and Twilio are connected! You can now proceed to set up the app as shown in the next section.
Before You Start: How Tasks Are Created in Twilio
Before configuring the app, it's important to understand how tasks are created and routed to Twilio Flex using the integration.
Twilio numbers automatically generate tasks, while other actions require HubSpot workflows to trigger task creation.
You can trigger the creation of tasks in Twilio directly from HubSpot workflows, based on specific events or conditions.
1. 🔔 New Lead Assigned to Sales
A contact is added to HubSpot (e.g. from a form submission), and a workflow triggers a task in Twilio for a sales agent to call the lead.
This ensures immediate follow-up directly from Twilio Flex.
2. 📞 Incoming Phone Calls
When a customer calls a phone number configured in Twilio, a task is automatically generated and shown in Twilio Flex. If the number matches an existing contact in HubSpot, the contact’s name will be shown.
If no match is found, only the phone number will appear in the task panel.
Customize the app
Under Settings > Integrations > Connected Apps the Super Admin can change the app settings. Once you have chosen the tier best suited to your needs and entered all the basic information in Plugin Settings, you can modify the app to make it fit your needs.
Let us now take a look at the functionality of the various Plugin Settings tabs.
Remember that to change app settings you need to be Super Admin or have the required permission in HubSpot.
User List
Here you can choose which users will be enabled in Flex to use the tools offered by the app. The limit of the user depends on the pricing tier.
In this list, you will find the workers registered in your Flex account. To add users in Flex, we recommend following this guide.
A user in this list may not be a HubSpot user, but it is still possible to enable them to use the tools in Flex.
Conditions - Customize What Agents See in Twilio Flex
This section is the core of the integration. It determines what information is displayed to agents in Twilio Flex when a new task (such as a call or message) arrives.
By default, the app displays tabs with the main object data (like Contact or Ticket information). These default tabs are pre-configured, but you can fully customize them using Conditions.
➕ How to Create or Edit a Condition

To tailor the experience, click “Edit” on an existing condition or “Create new condition” and follow the guided setup. Here’s how it works step-by-step:

1. Select the Object the Condition Will Apply To
From the “Select Object” dropdown, choose the HubSpot object (e.g., Contact, Company, Deal) that you want the condition to check.
2. Define the Triggering Rule
Choose a property and a conditional value.
Example: If Contact “Lifecycle Stage” is “Customer”
When an incoming task matches this rule, the corresponding section will be shown to the agent.
3. Choose What Will Be Displayed and to Whom
Decide which HubSpot object data should be displayed (e.g., the associated Contact or Company).
You can also choose to display a Form (previously configured in the “Forms” section) to the agent.
Specify which agents or roles should see this information.
4. Select Which Properties to Show and Permissions
Pick which specific fields should be visible in the panel.
Fields can be set as view-only or editable.
Note: Some properties are restricted by HubSpot and can only be shown in read-only mode, regardless of your selection.
Example Conditions:
Here are some specific examples of conditions you can create for Twilio Flex:
1. Show Information for "New Leads"
Condition:
-
Object: Contact
-
Property: Lifecycle Stage
-
Conditional Value: Lifecycle stage is "Lead"
Outcome: When a new task (call/chat) arrives from a contact with the "Lead" lifecycle stage, only basic contact information like name, email, and phone number will be shown. Other details will be hidden, focusing on the most relevant data for new prospects.
2. Example Condition – Show "Deals" and "Tickets" Tabs If Associated
Condition:
This condition shows the Deals and Tickets tabs in Twilio Flex only if the incoming contact has associated deals or tickets in HubSpot.
Outcome: When a task comes in (e.g. a call) from a contact who already has existing deals or tickets, the relevant tabs will automatically appear in the Twilio Flex interface, giving agents full context.
✅ Tips:
-
Use conditions to show only relevant information to agents based on the context of the task.
-
This feature helps reduce clutter and improves agent focus and efficiency.
In this way, the integration becomes more dynamic and tailored to each task's context, enhancing productivity and providing agents with the precise information they need when a task arrives in Twilio Flex.
Pipelines – Creating CRM Records and Viewing Engagements from Twilio Flex
This section allows you to configure whether agents working in Twilio Flex can create new Deals or Tickets in HubSpot, and which historical engagements related to those records should be displayed during interactions.
Enable Deal or Ticket Creation from Twilio Flex
If the toggle is enabled, agents will be able to create a new Deal (or Ticket) in HubSpot directly from the Twilio Flex interface, during a live interaction with a customer.
You can then select:
-
Select the pipeline in which the Deal should be created (e.g., Sales Pipeline)
-
Which stage of that pipeline it should start in (e.g., Appointment Scheduled)
If the toggle is disabled, agents will not be able to create new Deals or Tickets from within Flex.
This setting ensures that any new Deal or Ticket created from Twilio Flex will automatically enter the CRM in the correct pipeline and stage — ready for follow-up by the sales or support team.
Engagements – What Agents Will See in Flex
You can also choose which types of past engagements should be visible to agents within Twilio Flex, for both Deals and Tickets.
Real-World Example: Creating a Support Ticket from a Call
An agent receives a call in Twilio Flex from a customer needing support.
-
The agent sees past engagements like emails, notes, and tasks related to the issue.
-
With one click, they create a new Ticket directly from Flex.
-
The Ticket is automatically saved in HubSpot under the selected pipeline and stage (e.g. Support Pipeline → New).
-
The agent logs the call or adds a note — all saved as engagements linked to the Ticket.
👉 This gives the support team full context and speeds up resolution — without switching tools.
Forms
On this page you can create forms to be filled in when a task arrives from the agents in Flex. Once completed in Flex, the form will update the properties in HubSpot with the values entered. To tie different forms to specific conditions please refer to the Conditions section of the guide.
Once the creation of the form has started, proceed to choose a name (we recommend choose a descriptive name to easily recognise it in the conditions section) and then choose the properties to display. Forms can be constructed with properties of different objects and will be the first thing that appears when a new task enters Flex as shown in the Agent guide.
If there is a need to enter mandatory properties you can indicate this in the choice. The agent will be obliged to enter them in order to submit the form.
Example Form – Callback Request from an Incoming Lead
A new lead contacts your team via call and asks to be contacted later.
You can create a “Follow-up” form that appears in Twilio Flex when certain conditions are met (e.g. Contact's lifecycle stage is “Lead”).
📌 How to Configure the Condition to Show the Form to All Users
1. Go to the Forms tab and create a new form. You can select the field that you want to show in Twilio.
2. Go to the Conditions tab and click “Create New Condition” as shown in the screenshot below. In Step 3, you will be able to choose the form you created.
Result:
The configured form will be displayed in Twilio Flex. Agents can access it by clicking the pop-up located at the bottom-right corner of the interface.
Within the form, they can enter a follow-up date. Using a HubSpot workflow, the task can then be automatically re-routed to Twilio Flex on the specified date, serving as a reminder to follow up with the contact.
If you need support, please don’t hesitate to contact us at apps@exelab.com.